White Pumpkin Painting Ideas

White Pumpkin Painting Ideas with a Chic, Dramatic Twist
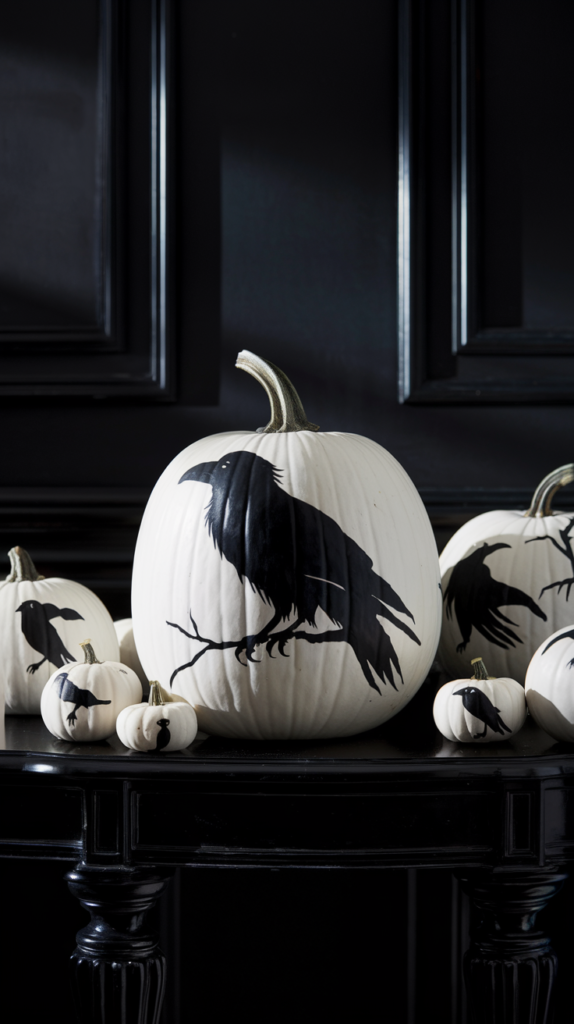
White pumpkins offer a perfect blank canvas for your fall decorating projects. Whether you want something chic, spooky, or artistic, painting white pumpkins lets you easily customize your look to fit any style. You can create elegant designs, playful patterns, or bold seasonal statements that bring charm to your home without the mess of carving.
With just a few simple supplies like acrylic paint, stencils, or even nail polish, you can transform plain white pumpkins into eye-catching pieces. The smooth, neutral surface makes it easy to experiment with different colors and themes, whether you’re aiming for modern glam or whimsical autumn vibes.
Painting your pumpkins also means your decorations will last longer and stay vibrant throughout the season. This approach is perfect if you want quick, low-effort ways to add personality to your mantel, porch, or Thanksgiving table.
Getting Started With White Pumpkin Painting
Before you start painting your white pumpkins, it’s important to select the right pumpkin, gather the proper supplies, and prepare the surface to ensure your design turns out crisp and lasts through the season. These steps set the foundation for a smooth and enjoyable painting experience.
Choosing the Best White Pumpkins
Look for white pumpkins that have a smooth, unblemished surface. Small to medium-sized pumpkins work best because they’re easier to handle and allow for more detailed painting. Avoid pumpkins with soft spots or bruises, as these can cause paint to peel or crack.
You can find varieties like Lumina or Casper white pumpkins at farmers markets or garden centers. Their bright white color offers a clean canvas for acrylic paint or spray paint. If you want a spooky or chic look, pick pumpkins that have a slightly matte finish rather than a shiny one, as paint adheres better.
Essential Painting Supplies
For a painted white pumpkin, you’ll want quality acrylic paint or spray paint designed for craft use. Acrylic paint offers vibrant colors and good coverage, especially for detailed designs like patterns or faces. Spray paint is faster and gives a smooth, even base but less control for intricate work.
Other supplies to have ready include:
- Paintbrushes in various sizes (fine for details, flat for filling large areas)
- A palette or plate for mixing colors
- Painter’s tape if you want clean edges or geometric shapes
- Paper towels or cloth for quick cleanups
- Sealant spray to protect the finished design against smudging or moisture
Choosing the right tools upfront makes your pumpkin painting easier and more precise.
Prepping Your Pumpkin for Painting
Make sure your white pumpkin is clean and dry before you start. Use a damp cloth to wipe off any dirt, dust, or residue, then let it air dry completely. This ensures the paint sticks properly and prevents peeling later.
If the pumpkin has a glossy surface, lightly sanding it with fine-grit sandpaper can improve paint adhesion. You may also want to apply a thin base coat of white acrylic paint or white spray paint to create an even surface, especially if the pumpkin’s natural color is off-white or dull.
Finally, place your pumpkin on a protected surface or newspaper to catch any drips or spills during painting. Taking these prep steps will help you achieve smooth, lasting results.
Fundamental White Pumpkin Painting Techniques
To create striking white pumpkin paintings, you’ll want to focus on how you apply paint, use stencils for clean shapes, and develop freehand skills. Each technique helps you achieve different effects—from precise patterns to unique, artistic flair.
Brush Application Basics
Using acrylic paint is your best bet for white pumpkin painting because it dries quickly and adheres well to the pumpkin’s surface. Start with a clean, dry pumpkin to ensure paint sticks properly. Use a flat brush for broad strokes and to cover larger areas smoothly.
For details and smaller designs, switch to a round or liner brush. Thin your paint slightly with water to avoid thick, uneven layers, but don’t overdo it or the paint may run. Applying two thin coats is better than one thick one for a crisp finish.
Make sure to let each layer dry fully before adding more paint or different colors. This prevents smudging and keeps your design sharp. You can also try spray paint for a quick base coat, but finish with brush detailing for better control.
Working With Stencils
Stencils are ideal when you want clean, repeatable patterns or shapes like polka dots, stripes, or letters. To use them effectively, tape the stencil flat against your pumpkin to prevent paint bleeding underneath. A stencil brush or small sponge works best for applying paint here.
Use a dabbing motion instead of brushing side to side. This minimizes smudging and keeps the edges of your design crisp. Acrylic paint is perfect for stencil work because it dries fast and adheres well without seeping.
Once your paint is dry, carefully remove the stencil by lifting straight up. If paint has bled, use a fine brush to touch up edges. Stencils allow you to combine chic geometric shapes with seasonal themes, making your white pumpkins both stylish and neat.
Freehand Design Tips
Freehand painting lets you be creative and add a personal touch. Start by sketching your design lightly with a pencil for guidance. Use a fine-tipped brush and acrylic paint to work slowly, especially for intricate details like vines, spooky faces, or elegant flourishes.
Keep your brush strokes small and controlled. You can build up layers gradually to deepen colors or add shading. If you make a mistake, acrylic paint can be wiped off gently when still wet or covered with another layer after it dries.
For smooth lines, rest your elbow on a surface to steady your hand. Experiment with colors that contrast nicely against the white pumpkin—black for classic spooky, gold or silver for chic styles, or soft pastels for artistic vibes.
Ghostly Brushstrokes
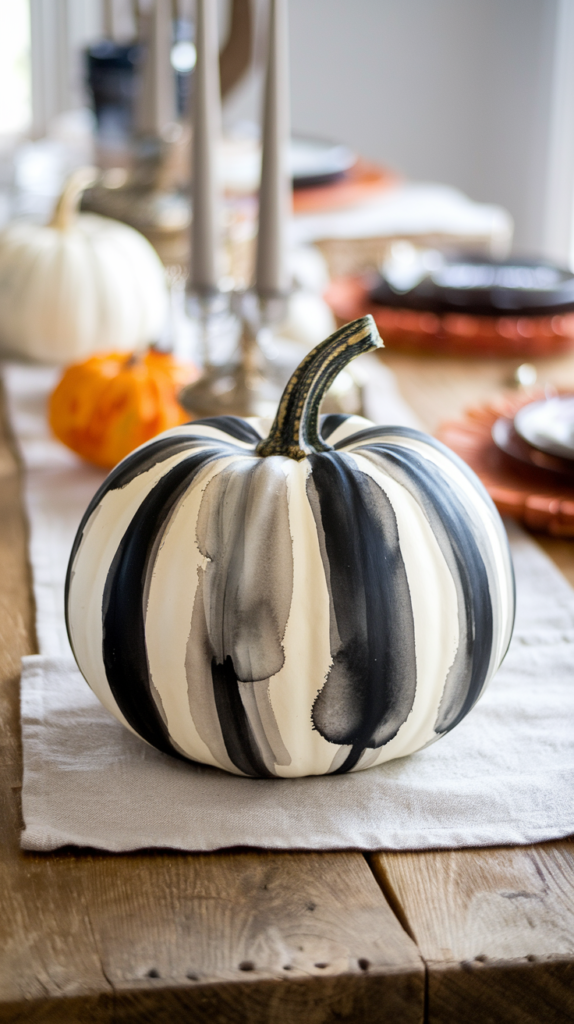
You can start by painting your white pumpkin with soft black and gray strokes. These brushstrokes mimic watercolor shadows and give your pumpkin an artistic, ghostly feel without going full spooky.
Use thin, sweeping brush movements to create a light, ethereal effect. This style is perfect if you want a chic Halloween decoration that leans more toward art than craft.
Try layering the shades for depth—start with pale grays and add darker tones for contrast. You’ll get a subtle haunting look that works well in any fall décor.
To add personality, paint hollow eyes or wispy shapes with faint blacks. Keep them minimalistic so your pumpkin still looks elegant.
Materials you’ll need:
- White pumpkin (real or faux)
- Black and gray acrylic paints
- Soft paintbrushes with varying sizes
This approach also works well for no-carve designs, so it’s a clean, easy way to enjoy pumpkin decorating without the mess.
By focusing on ghostly brushstrokes, your pumpkin will capture a spooky spirit in a quiet, artistic way.
Moonlit Marble
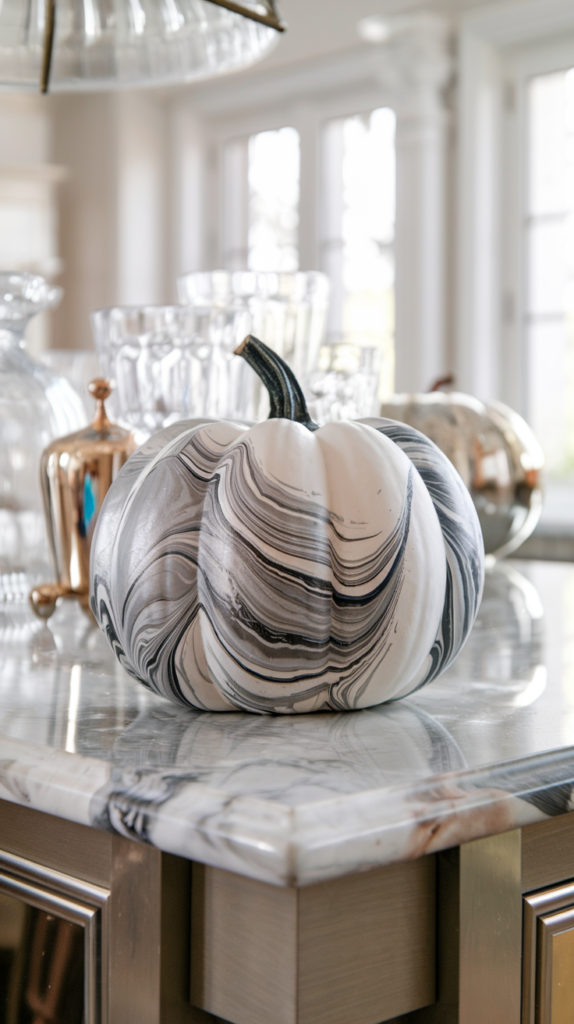
For a chic and artistic look, try the Moonlit Marble technique on your white pumpkin. You’ll use swirls of silver and charcoal paint to mimic the natural veining of marble. This gives your pumpkin a sophisticated, stone-like finish.
Start by applying a base coat of white or very light gray paint. Once dry, dollop small amounts of silver and charcoal paint onto the surface.
Use a brush or a thin stick to gently swirl the colors together. Don’t overblend—keep the veins distinct to replicate real marble patterns.
This style fits perfectly with modern fall decor. It’s subtle but eye-catching, adding an elegant touch without being overly spooky.
To enhance the luxe feel, you can add accents of metallic silver or pewter paint along the veins. These details catch the light and deepen the marble effect.
You’ll find that the Moonlit Marble finish pairs well with other white or neutral decorations. Try placing your pumpkin alongside candles or natural wood pieces to complete the look.
Starlight Speckle
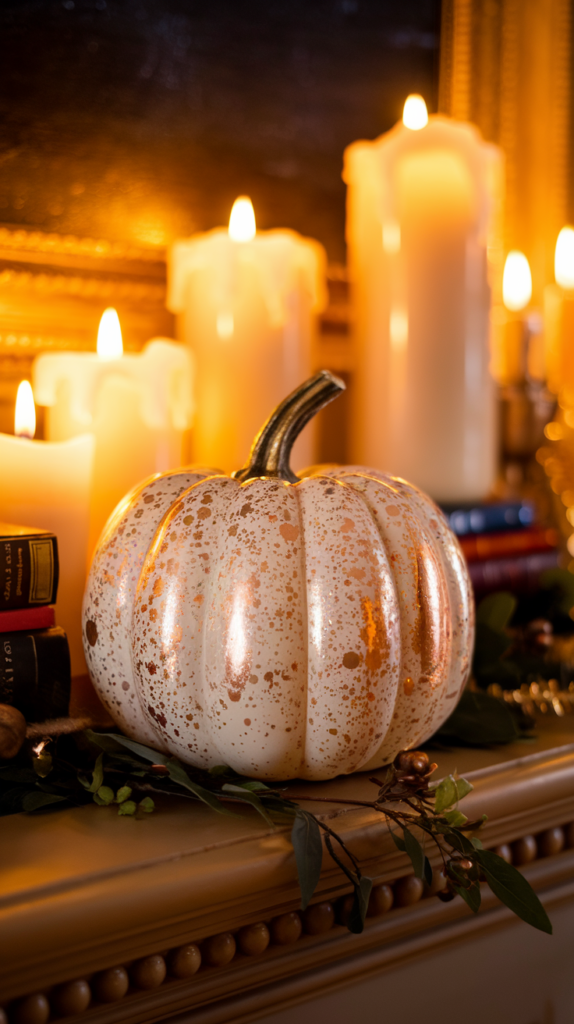
Give your white pumpkin a magical touch by adding a speckle effect that mimics a starry night. Start by painting the pumpkin a smooth white base if it isn’t already white.
Next, dip a stiff brush or old toothbrush into metallic paint—gold or copper work especially well. Flick the brush gently over your pumpkin to create tiny, random speckles that look like sparkling stars.
The beauty of this design is in its simplicity. The subtle shimmer from the speckles catches candlelight perfectly, turning your pumpkin into a glowing, celestial decoration.
You can vary the size of your speckles by controlling the flicking pressure. Try adding a few larger drops for extra dimension and let the paint dry completely.
This technique is artistic but easy enough to do with minimal supplies, making it ideal for all skill levels. Once finished, place your Starlight Speckle pumpkin near a light source to watch it twinkle softly.
Midnight Drip
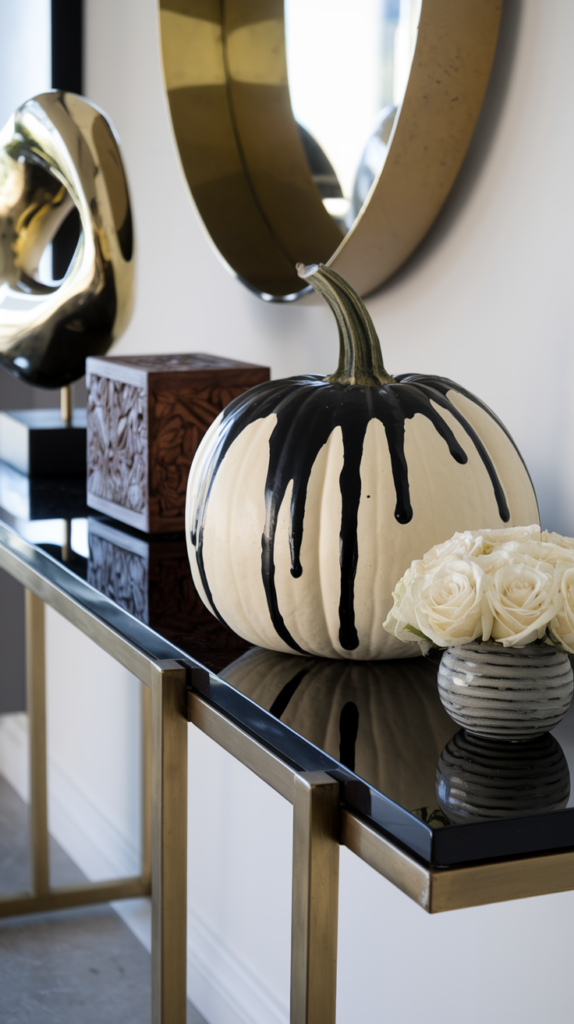
Start by painting your white pumpkin with a smooth, glossy white paint. Let it dry completely before adding the dripping effect. This base creates a sleek, chic backdrop for the look.
Next, focus on the stem. Use thick black paint or gloss to create drips flowing from the top down the sides. The drips should vary in length to mimic natural dripping liquid.
Your goal is a bold contrast between the bright white pumpkin and the dark, shiny drips. This style feels both spooky and artistic—perfect for a subtle Halloween statement with a touch of glamour.
To enhance the effect, try using a high-gloss finish on the drips while keeping the pumpkin surface matte. This contrast in texture adds depth and interest.
You can also experiment with metallic black paint or add a hint of shimmer for extra flair. Pair with simple fall decor like black candles or silver accents to complete the look.
Candy-Coated Fade
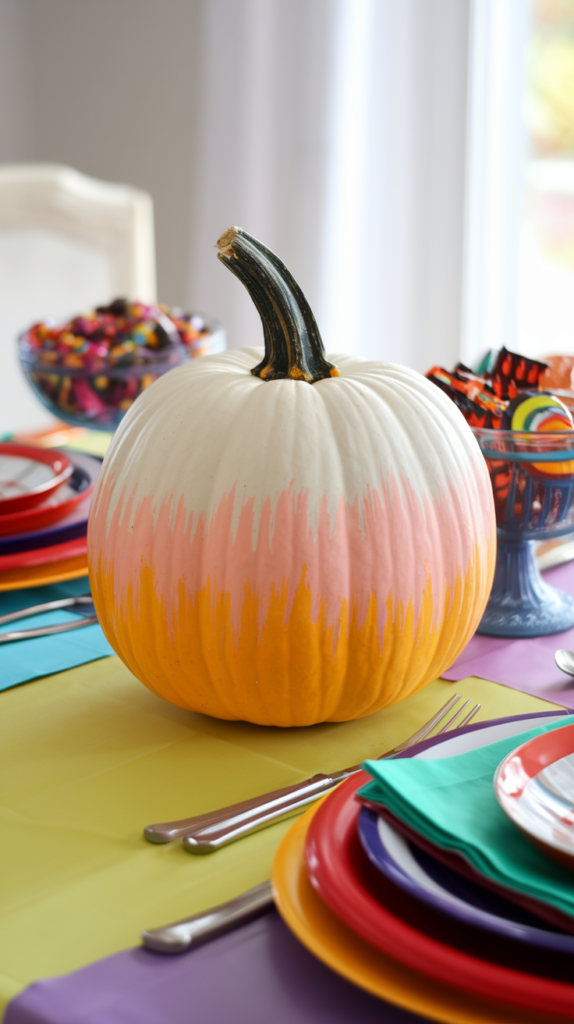
You can create a playful and bright look by blending candy-corn colors in an ombré effect on your white pumpkin. Start with a soft white at the top, fade into peach in the middle, and finish with a pale orange near the base. This smooth transition adds a fresh twist to your fall decor.
Use acrylic paints to layer each color gently. Let each shade dry before moving on to the next to avoid mixing. This technique keeps your colors crisp but blended.
For an extra touch, try adding a glossy finish after your paint dries. It gives your pumpkin a candy-coated shine, making it look almost edible.
If you want to add detail, you can paint small dots or stripes over the fade in complementary candy colors like white or soft pink. This adds subtle texture without overpowering the ombré.
Materials needed:
| Item | Purpose |
|---|---|
| White pumpkin | Base for the paint |
| Acrylic paints | Yellow, orange, pale peach |
| Paintbrushes | Different sizes for blending |
| Glossy sealant | Candy-coated shiny finish |
This idea works well if you love a mix of chic and playful in your fall decorations. It’s simple yet makes a statement on your porch or table.
Visit these companion articles for more white pumpkin ideas:
Other Creative Themes for White Pumpkin Painting
You can explore a variety of distinct themes when painting white pumpkins to fit your fall and Halloween decor. Each theme offers different artistic options that bring out seasonal charm and let you express your personal style in fresh ways.
Seasonal Autumn Motifs
For a cozy autumn vibe, focus on classic fall symbols like leaves, acorns, and warm-toned berries. Painting clusters of vibrant orange, red, and gold leaves on your white pumpkin creates a striking contrast that highlights the pumpkin’s smooth surface.
Try adding simple patterns like stripes or polka dots in rich fall colors such as burnt sienna or mustard yellow. These can make your pumpkins versatile for any part of your fall decorating, including mantels or tables. This style feels timeless and complements rustic or farmhouse settings beautifully.
Halloween-Inspired Art
If you want spooky and whimsical, Halloween themes are perfect. You can paint silhouettes of bats, witches, or haunted houses in black for a dramatic effect.
Faces or spooky eyes give your white pumpkins character while staying mess-free compared to carving. Use glow-in-the-dark paint or metallic accents to elevate the eerie vibe and create pumpkins that stand out even at night.
This theme allows you to balance fun and chill with designs ranging from cute ghosts to gothic art.
Harvest and Thanksgiving Accents
Celebrate the harvest with warm, inviting colors and icons that symbolize abundance. Think painted pumpkins featuring cornucopias, wheat sheaves, or smiling scarecrows.
Muted earth tones work best here—deep browns, ochre, and olive greens add a grounded feel while maintaining seasonal style. You might also paint scripts or quotes related to gratitude, pairing your pumpkins with pinecones and gourds.
This artistic direction makes your white pumpkin a subtle yet meaningful part of your Thanksgiving decor.
Nature-Inspired Patterns
To bring a natural touch indoors, paint botanical patterns like ferns, vines, or delicate florals. Soft, muted greens and pastels work well on a white base for a fresh, elegant look.
You can explore abstract leaf designs or detailed flowers to match your personal artistic preference. This style fits well with modern or chic fall decor that aims for understated beauty rather than bright seasonal colors.
Incorporating small gold or copper accents adds dimension and a sophisticated shimmer to your painted pumpkins.
Tips for Showcasing and Preserving Your Painted Pumpkins
To keep your painted white pumpkins looking fresh and stylish all season, focus on smart placement and proper care. Highlight your artistic design by choosing the right spots, and protect your work to maintain its color and shape against weather and wear.
Displaying Painted Pumpkins Indoors and Outdoors
For indoor fall decor, place your painted white pumpkins on sturdy surfaces like mantelpieces, shelves, or side tables. Use trays or plates underneath to catch any moisture. Group pumpkins with warm-toned candles or rustic elements like hay bales for a chic, cozy vibe.
Outdoors, choose shaded or covered areas to avoid direct sunlight, which can fade your paint. A porch table or covered step works well. Elevate pumpkins using wooden crates or plant stands to create a layered, artistic display. Avoid damp spots to reduce moisture buildup that causes faster decay.
Protecting Your Designs for the Season
Start by applying a clear acrylic sealer once your paint is completely dry. This locks in color and shields against moisture. For added protection, lightly dust your pumpkins with cornstarch to absorb excess moisture underneath the paint.
If your pumpkin is carved, spray on a clear, waterproof sealant inside and out every few days to extend its life. For uncarved painted pumpkins, occasional misting with a mixture of water and a few drops of bleach can prevent mold. Always store pumpkins in cool, dry places when not on display.
